Computer Science Homework Help
University of Florida Computer Science and C Programming Lab Report
computer lab assignment. C++
please see below for more info.
it will be a super quick one.
scroll down to see the tasks.
please copy the link u got from the task and past it in a word doc with the code u used under it.
use this link to do the tasks http://cpp.sh/
Lab: Introduction to C++
Overview
In this lab you will become familiar with C++. This is intended for those who have little to no programming background. Any programming experience will make your life easier for sure.
In the process you will:
- Understand the basics of the C++ language.
- Understand the compilation process.
- Write the traditional “Hello World”.
- Obtain input from the command line.
- Discuss some basic data types.
C++ and the Compilation Process
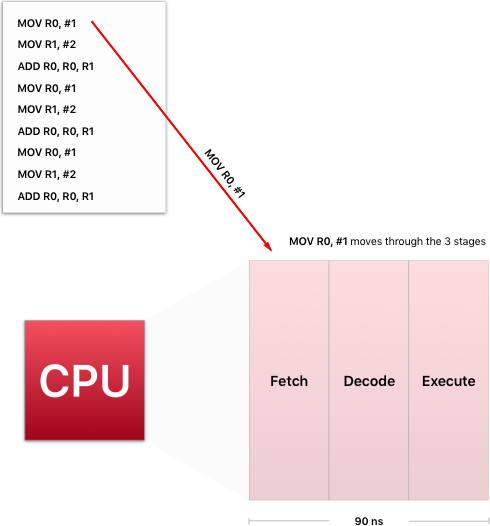
A program is just a list of instructions that a processor can execute. A processor takes each instruction from the list and executes it. Processors execute instructions like “store 1 in memory location 0x1234”. You can see below a list of instructions that go through a processor to be executed.
undefined
undefined
A program needs to go from a text file to instructions that processors can use. The image below illustrates the C++ compilation process.
undefined

undefined
The preprocessor applies some modifications to the original source code and then feeds it to the compiler. The compiler is just a program that given source code will output an object file. An object file is an intermediate step in the generation of an executable. A collection of object files (and external libraries) are put together by the linker to produce an executable. Your OS will load your executable via its loader and your program will then reside in memory.
“Hello World”
Let’s start with the classical “Hello World” program. We will explain each line as we go through this lab. The source code is provided below. Try it out online here.
#include <iostream>

int main(){
  std::cout << "Hello World!n";
  return 0;
}
The code above contains keywords such as int. You might have seen other keywords such as double and while. It also contains identifiers. Identifiers include variable names, function names (such as main in the snippet above), among others. You can also see some literal values such as "Hello World". These are constants that are specified in the code. You can also notice the punctuation used in the snippet. We use { } braces to delimit functions and code blocks. We also use ; at the end of some statements. In case you were wondering, the << is an operator. Other operators such as +, -, %, &&, and || are probably familiar to you.
We are now going to go over each line in the snippet above. The first line starts with a # symbol. These lines are preprocessor directives. The #include tells the preprocessor to get the contents of the iostream file. Including iostream allows us to use the console for input and output. We then have int main() { ... }. This is the entry point to our program. All C/C++ programs need a main function that signals where the program begins. The curly braces encompass the instructions that are part of this function. In other words, what goes inside the braces gets executed when the program starts running.
We now face std::cout << "Hello World!n". The sequence of characters in between the quotation marks is called a string. We print to the console using cout << "Hello World!n". Here we are using the << operator. For now, think of it as if "Hello World!n" is flowing into the console’s output. The n is an escape sequence that means new line. We haven’t mentioned std:: yet. The :: is called the scope resolution operator. In the snippet above it is basically telling the compiler to look for cout in the std namespace. A namespace is a way of organizing code into groups. The cout, cin, among other symbols are within that namespace. You need to prepend the std:: before any use of cout to let the compiler know where to find it.
Let’s try a different version of our “Hello World” program. Try it out online here.
#include <iostream>

// With the following line there is no need to prepend std:: before every cout.
using namespace std;

int main(){
  cout << "Hello World!n";
  return 0;
}
The only difference is that we now have this line using namespace std;. The program runs the same way but this time we don’t need to prepend std:: before any cout or cin. This tells the program to look in the std namespace for any identifier that is not defined in our code.
We finish the main function with a return 0. When a program finishes running successfully it returns a zero to tell the operating system that everything went alright. Returning other values than zero means that some error occurred. Don’t worry about this yet, it will be covered when we reach functions. For now just remember that the last line in your main function should be return 0.
Language Basics
If you think of a sentence as a building block in the English language, then you can probably relate to C++’s statements. Statements are the fundamentals of code blocks and along with expressions they allow you to create complex programs.
Expressions differ from statements because they evaluate to something. For instance 2 + 2 is an expression because it evaluates to 4. This resultant value is of a certain type. For instance in our 2 + 2 example, the resultant value is the integer 4 which is represented by the int data type. We can also store characters such as 'a' or '4'. Notice that 4 is a number while '4' is a character. Characters are inside single quotes. You could also have decimal numbers such as 3.1416 and those belong to the double data type. There are different data types available for you in C++ and if you get bored you can even make your own!
For now let’s just list some common types:
int: Integer numbers.char: Characters or small integers.double: Decimal or floating-point numbers.
Storing an int in memory requires more memory than storing a char. Each data type has its own memory needs. char for instance requires 1 byte of memory. The int data type is typically 4 bytes long on most computers. A microcontroller, however, might allocate only 2 bytes for an int data type.
So far we have talked about storing values in memory but we haven’t actually showed you how. In order to do this we are going to assign a name to a portion of memory and store a value of a specific data type in it. Creating that named portion of memory is called declaring a variable. Let’s say that we want to store the value of our 2 + 2 expression. We would do so by first declaring a variable of int type.
int sum;
Declaring a variable is simple. Just write the data type you need to store followed by a whitespace and an identifier (i.e. a name). In the snippet above we declared a variable of type int named sum. We now have to set the value 2 + 2 in our variable.
int sum;
sum = 2 + 2;
In the code above we are assigning the result of 2 + 2 to the variable sum. Now, every time you use sum in your code you are using the result of 2 + 2 which is 4.
Let’s see a working example. Try it out online here.
#include <iostream>
using namespace std;

int main(){
  int sum;
  sum = 2 + 2;
  cout << "The result of 2 + 2 is: " << sum;
  return 0;
}
Console Input
Programs would not be that useful if they could not take user input. In this section we use cin to capture user input from the console.
To print to the console we used:
int number;
number = 4;
cout << number;
To receive input we use:
int userInput;
cin >> userInput;
If you noticed we are using the >> operator when storing input. You can think of it as moving the console input to the variable userInput.
Let’s see a working example. Try it out online here.
#include <iostream>
using namespace std;

int main(){
  int userInput;

  // Storing user input in the variable userInput.
  // Input can only be a number since we are using the int data type.

  cin >> userInput;

  // Printing the user input.

  cout << "Input is: " << userInput;

  return 0;
}
Simple Flow Control
Programs execute the statements in order. Sometimes we wish we can alter the execution based on the circumstances. Control structures allow programs to decide whether to execute or not a group of statements and affect the program’s control flow. In this section we are going to cover a simple conditional construct, the if statement.
In order to change the control flow of the program we must first test for a certain condition. For instance, if the user’s input is less than 5 we might take route A, otherwise we will take route B. This is illustrated in the flowchart below. If you need help understanding the flowchart symbols visit this site.
undefined

undefined
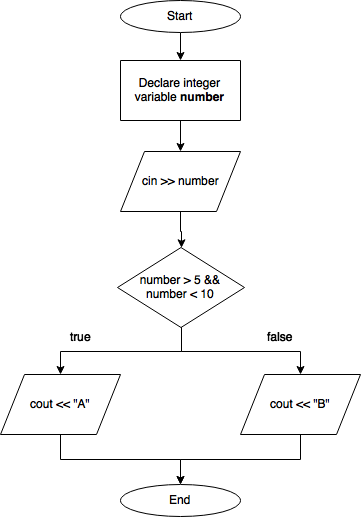
As you could see we used a < sign to test whether the input was less than five. That symbol is an example of a relational operator. Sometimes you want to test for a more complex condition. Let’s say we want to test for a number greater than 5 and less than 10. See the flowchart below.
undefined
undefined
As you can see the condition has changed. It went from number < 5 to number > 5 && number < 10. The && (and) is a logical operator. The table below lists relational and logical operators.
| Operator | Type | Description |
|---|---|---|
| < | Relational | Less than |
| <= | Relational | Less or equal to |
| > | Relational | Greater than |
| >= | Relational | Greater or equal to |
| == | Relational | Equal to |
| != | Relational | Not equal to |
| && | Logical | And |
| | | | Logical | Or |
| ! | Logical | Not |
Evaluating a condition returns a value of true or false. These boolean values are of type bool. As expected, you can create a variable that holds the result of a boolean expression as shown below.
bool result;
result = (x < 5);
Let’s now show you an example code for the flowchart above with the condition number > 5 && number < 10. Try it out online here.
#include <iostream>
using namespace std;

int main(){
    int number;
    cin >> number;

    // Condition goes inside the if-statement.
    if (number > 5 && number < 10){
        // This executes if true.
        cout << "A";
    } else {
        // This executes if false.
        cout << "B";
    }
}
The only thing new in the code above if the use of the if statement. In order to create a valid if statement you need to follow this structure.
if ( condition ) {
  // Code here is executed if condition evaluates to true
}
Sometimes (as in the flowchart above) we want to do something if the condition is not true. In this case we have the if-else statement.
if ( condition ) {
  // Code here is executed if condition evaluates to true
} else {
  // Code here is executed if condition evaluates to false
}
Lab Task
We have three tasks to accomplish in this lab session.
- Grade Curving: Write a program that outputs a student’s grade after computing a curve. The program will take as input a student’s grade and the curve that will be added to the grade. The program will also output the letter grade obtained by the student.
See some examples below:
Enter a student's grade (0-100): 76
Enter a curving percentage (0 - 20): 14
Curving the student's grade by 14%
The new grade is: 86.64
Final letter grade: B

Enter a student's grade (0-100): 39
Enter a curving percentage (0 - 20): 20
Curving the student's grade by 20%
The new grade is: 46.8
Final letter grade: F
- Ascending Order: Write a program that inputs three integers from the keyboard and prints them in ascending order.
See some examples below:
Number 1: 3
Number 2: 5
Number 3: 1
Order: 1 3 5

Number 1: 10
Number 2: 2
Number 3: 13
Order: 2 10 13
- Toll Payment: Create a program that takes as an input an integer that represents the number of miles driven by an user. The program should output the amount that the driver owes according to the number of miles driven. Use the table below to set prices.
| Miles Driven | Cost |
|---|---|
| 0 through 100 | $5.00 |
| More than 100 but not more than 500 | $8.00 |
| More than 500 but less than 1000 | $10.00 |
| 1000 or more | $12.00 |
See some examples below:
Enter the number of miles driven: 543
You owe: $10.00

Enter the number of miles driven: 1234
You owe: $12.00
 Talk to us support@bestqualitywriters.com